This section covers how a device connects to the network and to the SPEKTRA Edge
platform: how you describe network configuration, how the device falls back
between connections, how to route through a proxy, what the device needs to reach
on the network, and how time is kept in sync.
Requires SPEKTRA Edge OS
Network configuration is applied by SPEKTRA Edge OS. On a device running the
droplet agent installed from a .deb package, network management is disabled
and the host keeps its own networking. See Install the droplet agent.
Network configuration model
Device networking is described as a Netplan-format YAML document. This is a
clean, declarative way to configure wired, Wi-Fi, and cellular connections, as
well as advanced setups such as bonds, bridges, VLANs, and tunnels.
You can supply the network configuration when you
create an install image (so the device has connectivity from first
boot) and you can update it later from the dashboard. When you push
configuration from the platform, you choose how it combines with what is already
on the device:
Mode
Behavior
Merge
The pushed configuration is merged with the device’s existing configuration.
Replace
The pushed configuration replaces the device’s existing configuration.
On the device, the baseline configuration — the one a device falls back to if a
pushed configuration fails — lives at /isodevice/config/interfaces.yaml. See
connection fallback.
Netplan reference
For configuration syntax and examples for each connection type, see the official
Netplan documentation. SPEKTRA Edge accepts standard Netplan YAML.
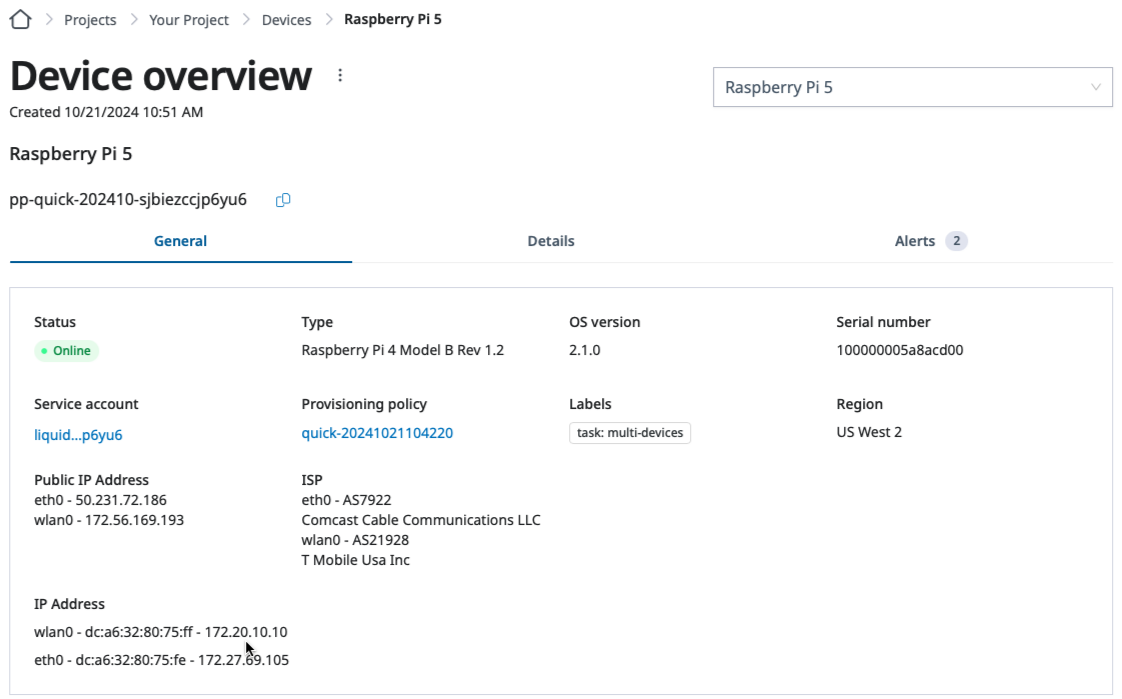
The device reports its observed network state back to the platform — active
interfaces, IP addresses, and carrier information — which you can view on the
device overview page.
Wired, Wi-Fi, and cellular
All three connection types are configured through the same network
configuration document:
Wired connections typically use DHCP by default and need no configuration
to come up.
Wi-Fi connections are configured with the network name and credentials.
Cellular connections are configured for the modem; a device can also be
associated with a SIM in the platform for inventory and activation tracking.
A field device often has more than one way to reach the network, and its
configuration can be changed remotely. To keep a configuration mistake or a link
outage from taking a device permanently offline, the OS has several layers of
fallback — network configuration fallback, uplink (interface and cellular)
failover, and proxy fallback. These are covered in detail on the
Connection fallback page.
In this section
Netplan configuration — a worked example of pushing network
configuration from the dashboard, using Wi-Fi on a Raspberry Pi.
Connection fallback — how the device stays reachable across bad
config pushes, link outages, and proxy failures.
Push Netplan YAML from the dashboard, with a worked Wi-Fi example.
Device networking on SPEKTRA Edge is configured with Canonical Netplan,
which provides a clean, YAML-based configuration and supports a wide range of
Linux networking managers. You edit that YAML from the dashboard and the
platform pushes it to the device.
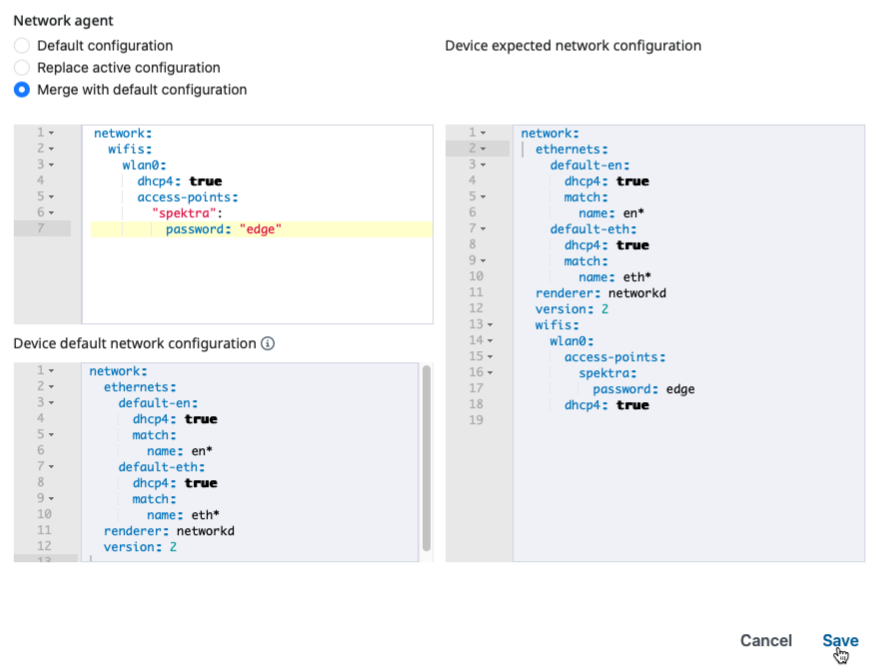
This page walks through one concrete case — adding a Wi-Fi interface to a
Raspberry Pi as a secondary uplink — so you can see the whole push-and-verify
loop end to end. The same flow applies to wired interfaces, VLANs, bonds, and
cellular; only the YAML differs.
Netplan how-to guides
Please take a look at the official Netplan how-to guides for additional examples
how to configure device networking.
Congratulations on configuring the Wi-Fi networking of your Raspberry Pi with SPEKTRA Edge.
With that, let’s move on to proxy configuration if your devices reach the
internet through a forward proxy, or to OS upgrades.
Onwards.
2 - Connection fallback
How a device stays reachable after a bad config push, link outage, or proxy failure.
Devices are often deployed where connectivity is imperfect: a misapplied network
change, a flaky uplink, or a proxy that goes down. SPEKTRA Edge OS has several
fallback behaviors that keep a device reachable and recoverable. This page
explains the three that matter most: network configuration fallback, uplink
(interface and cellular) failover, and proxy fallback.
Network configuration fallback
When you push a new network configuration to a device, there is always a risk
that the new configuration is wrong and takes the device offline — which would
also prevent you from pushing a correction.
To guard against this, a device can fall back to a known-good network
configuration that was established when the device was set up. If a
platform-supplied configuration leaves the device unable to reach the platform,
the device can revert to this baked-in configuration so it can be reached again.
You can control this behavior:
Setting
Effect
Fallback enabled (default)
If platform-supplied network configuration fails, the device reverts to its known-good configuration.
Fallback disabled
The device always uses the platform-supplied configuration and never reverts.
Disable fallback with care
Disabling fallback means a bad network configuration can make a remote device
unreachable until someone visits it physically. Leave fallback enabled unless you
have a specific reason and a way to recover the device locally.
Uplink failover (interfaces and cellular)
A device can have more than one uplink — for example wired Ethernet plus
cellular, or wired plus Wi-Fi. When multiple uplinks are configured, the device
prefers the primary uplink and uses the others as backups, switching to a working
uplink when the preferred one is unavailable.
A common, robust pattern is:
Wired Ethernet as the primary uplink (DHCP).
Wi-Fi or cellular as a backup that takes over when the wired link is
down.
Cellular is especially useful as a last-resort uplink because it does not depend
on local site infrastructure. Associate a SIM with the device during hardware
registration, configure the cellular connection in your network YAML, and the
device can fall back to it to stay manageable.
Proxy fallback
When a device is configured to reach the platform through a
proxy, it still needs to stay reachable if that proxy becomes
unavailable. The device evaluates the available paths to the platform and uses a
working one, so a single failed proxy does not necessarily cut the device off
from management.
This means you can introduce a proxy for normal operation without making it a
single point of failure for device management, provided a viable path to the
platform remains.
Putting it together
The three mechanisms guard different failures, so they stack: each one catches
what the ones above it cannot.
flowchart TD
    GOAL(["Device must stay<br/>reachable by the platform"])

    GOAL --> L1{"Is the pushed network<br/>configuration working?"}
    L1 -->|"no"| F1["Revert to the known-good<br/>configuration from setup"]

    L1 -->|"yes"| L2{"Is the preferred<br/>uplink up?"}
    L2 -->|"no"| F2["Fail over to a backup uplink<br/>(Wi-Fi or cellular)"]

    L2 -->|"yes"| L3{"Is the proxy<br/>reachable?"}
    L3 -->|"no"| F3["Use another viable path<br/>to the platform"]

    L3 -->|"yes"| OK(["Managed normally"])
For a remote, hard-to-reach device, a resilient setup combines all three:
Keep network configuration fallback enabled so a bad push self-corrects.
Provide a backup uplink (cellular is ideal) so a single link failure does
not isolate the device.
If you use a proxy, ensure a viable path to the platform remains so proxy
problems do not block management.
Route device and workload traffic through an HTTP or HTTPS forward proxy.
If your devices reach the internet through a forward proxy, configure the proxy
so that both the device’s connection to the SPEKTRA Edge platform and your
workloads’ traffic are routed correctly.
What you can set
Proxy configuration consists of the standard proxy settings:
Setting
Meaning
http_proxy
Proxy URL for plain HTTP traffic.
https_proxy
Proxy URL for HTTPS traffic.
no_proxy
Hosts and networks that should bypass the proxy (comma-separated).
In addition, you can specify which network interfaces the device should use to
reach the platform through the proxy, so control-plane traffic uses the intended
path.
Where to set it
You can configure the proxy:
at image creation, so devices use the proxy from first boot, or
from the dashboard for a device that is already online.
Which traffic uses the proxy
“The device uses a proxy” is three separate behaviors, and they do not all work
the same way. The distinction matters most for the third row.
Traffic
Uses the proxy?
How
The device’s connection to the platform
Yes
The agent opens an HTTP CONNECT tunnel through the proxy, then speaks TLS to the platform through it.
Container image pulls
Yes
The proxy settings are written into the container runtime’s own configuration, so pulls made on the device’s behalf follow them.
Traffic your workload makes once running
No
A running container does not inherit the device’s proxy settings.
Workloads do not inherit the proxy
Setting a proxy on the device does not route your application’s outbound
traffic through it. The device injects only its own LQD_* variables into a
workload’s environment — not HTTP_PROXY, HTTPS_PROXY, or NO_PROXY.
If your application must egress through the proxy, set those variables
yourself in the container’s environment in your compose definition, or
configure the proxy inside the application. This is the application owner’s
responsibility — see Shared responsibility.
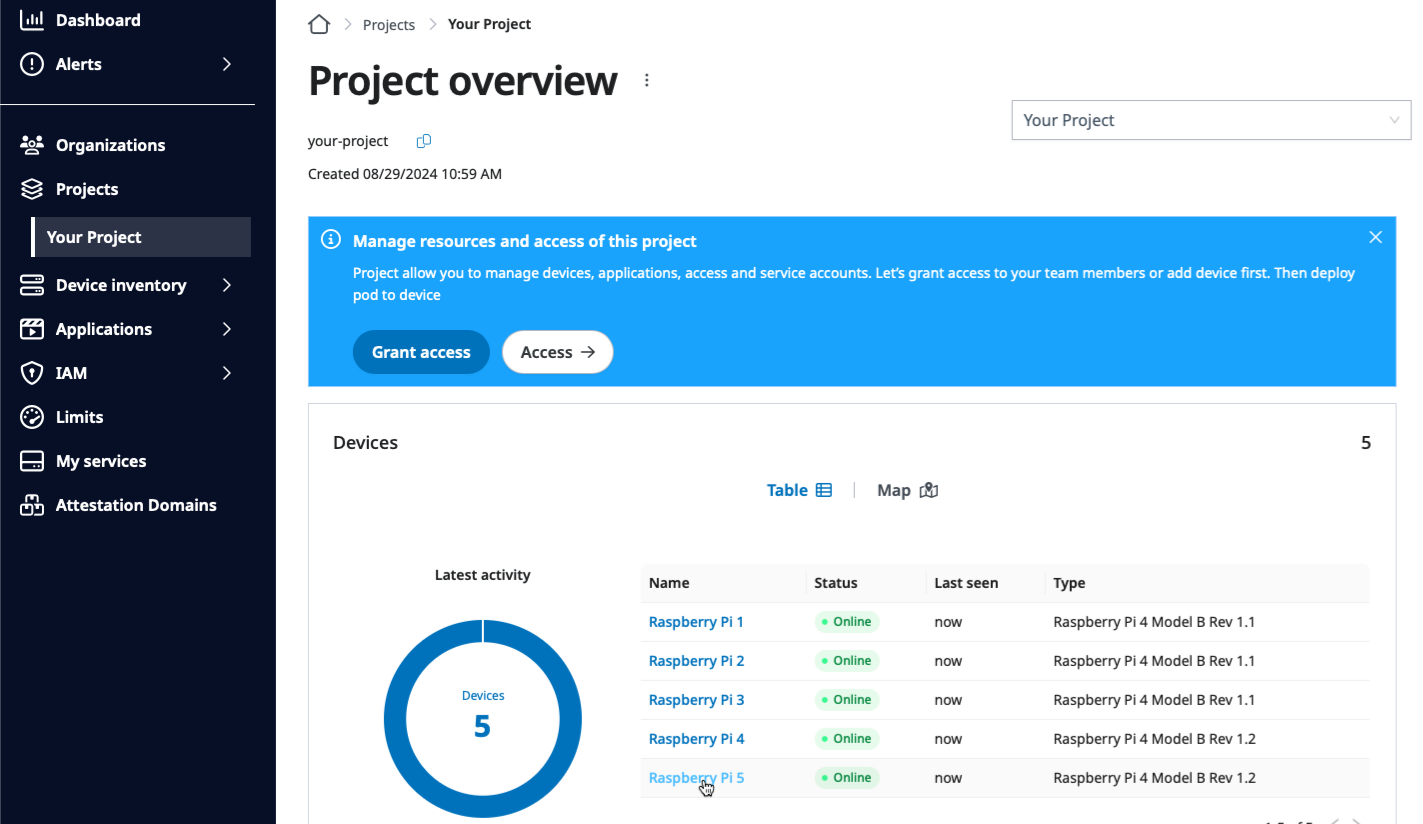
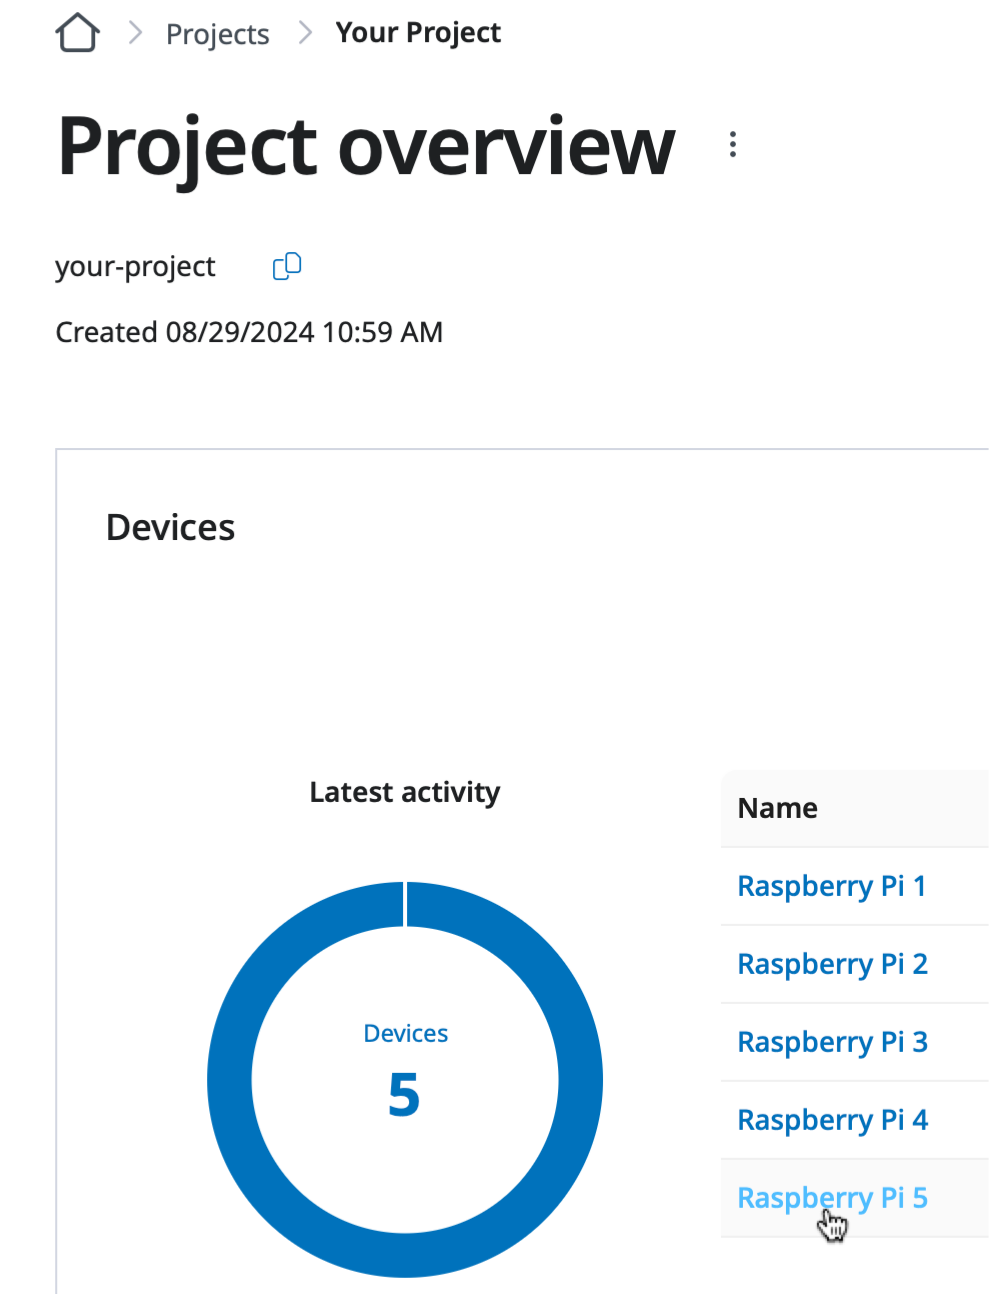
Go to the Device overview page of the target device under your project by clicking the
name of the device on the Project overview page.
Clicking the device name on the Project overview page.
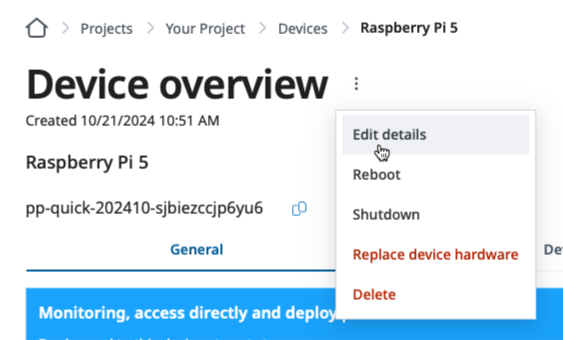
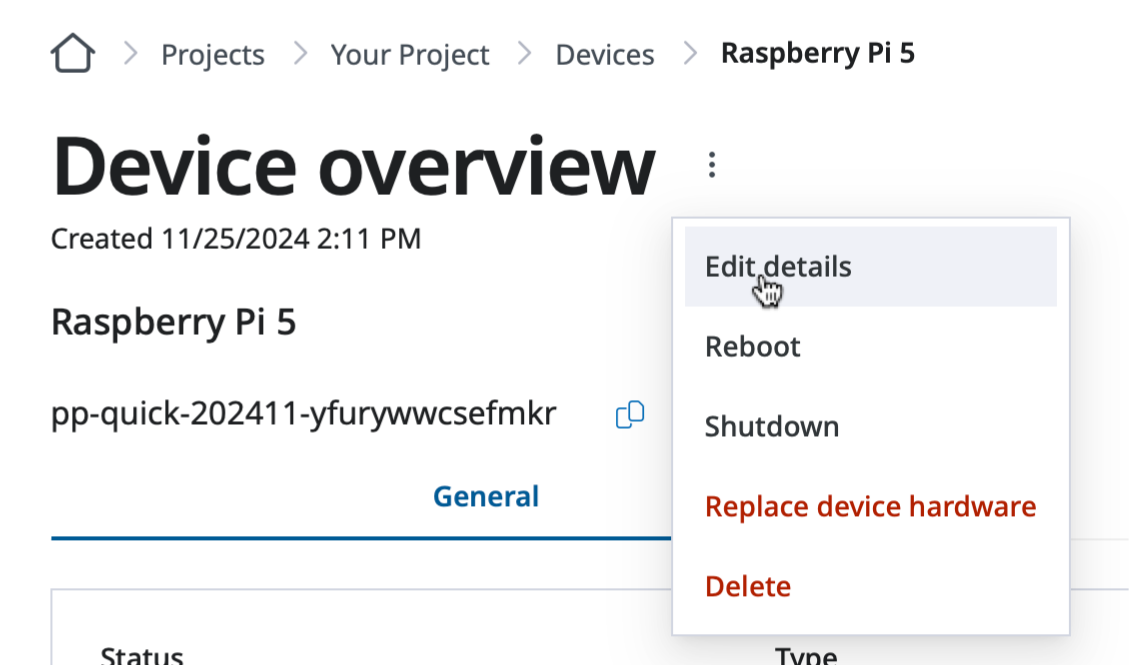
Open the Update device details page by clicking the Edit detail option of the
device menu option.
Click the Edit detail option of the device menu option.
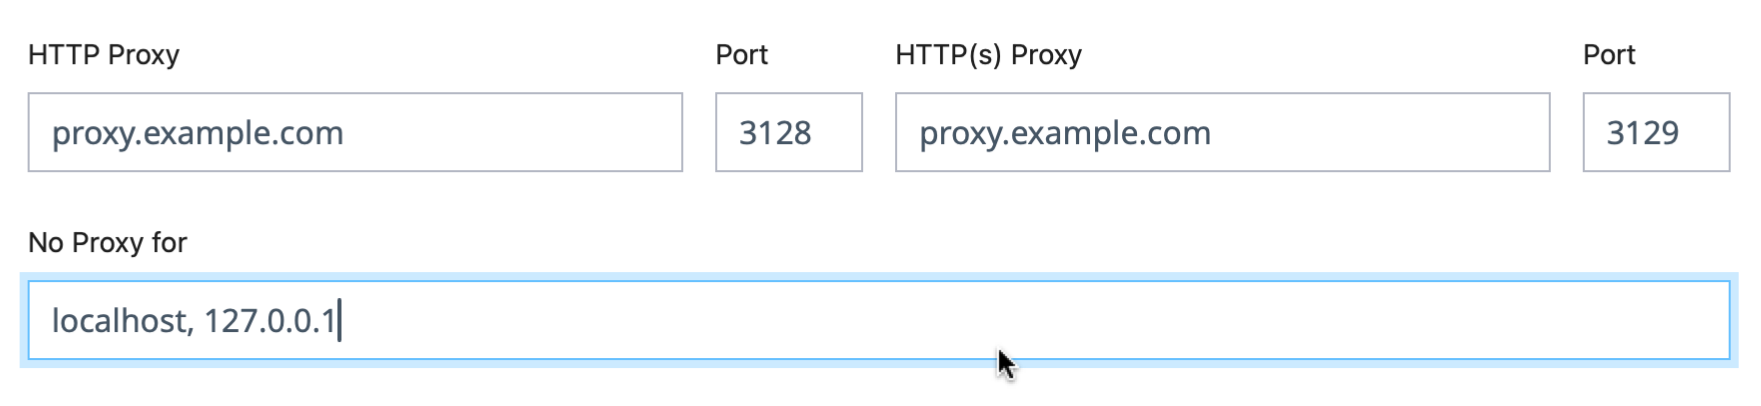
Configure the proxy server in the HTTP and/or HTTPS proxy server section of the
Update device details page.
You can configure the device to bypass the proxy servers for the particular
communication, e.g. the node local communication in the example below.
Configure the HTTP and HTTPS proxy servers on the Update device details page.
HTTPS proxy servers
Most of the container registries require the HTTPS connection to access and retrieve images.
Please consult the IT department on the access policies for the container registries and the
internet.
Save the page and you are good to go. The device goes through the proxy server
for the HTTP and HTTPS traffic.
What the proxy must allow
The device’s connection to the platform is gRPC over HTTP/2, carried inside a
TLS session on port 443. That places two requirements on the proxy.
It must allow CONNECT to port 443. The device does not send ordinary HTTP
requests to the platform; it asks the proxy to open a tunnel and then runs TLS
inside it. A proxy that only forwards HTTP methods, or that restricts CONNECT
to a narrow destination list, blocks the device.
It must not terminate or inspect TLS. A proxy doing TLS inspection
substitutes its own certificate for the platform’s. The device validates the
platform certificate against its trust store, does not find the inspection
certificate there, and the handshake fails.
TLS inspection is not supported
There is no supported way to install a corporate inspection CA into a device’s
trust store. If your network inspects TLS, you must exempt SPEKTRA Edge
destinations from inspection — see Connectivity & ports for the
names to exempt.
This is worth checking early. TLS inspection is often enabled network-wide and
invisible to the person installing the device, and it produces a device that
reaches the internet but never comes online.
Fallback behavior
The device determines the best route to the platform and will fall back to a
direct connection when the proxy is not usable, so a proxy outage does not
necessarily take a device offline. If you require that all traffic traverse
the proxy, ensure direct egress is blocked at the network level rather than
relying on device configuration.
no_proxy recommendations
Add to no_proxy any destinations that must not go through the proxy, such as:
on-site services the device talks to directly (local registries, local APIs)
link-local and private ranges used on the device’s LAN
Review connectivity & ports to confirm what the device must reach
through (or around) the proxy.
4 - Connectivity & ports
What a device must reach and what it listens on, for planning firewall rules.
This page lists what a device needs to reach on the network and what it accepts
on its own interfaces, so you can plan firewall rules for the sites where your
devices run.
Outbound connectivity (required)
A device reaches the SPEKTRA Edge platform over secure, outbound connections.
Devices do not need any inbound connections from the platform — all
communication is initiated by the device.
Destination
Port
Purpose
*.edgelq.com
TCP 443
Everything the device needs from the platform: onboarding, configuration, telemetry, log forwarding, remote access, and OS downloads.
Your container registry
TCP 443
Image pulls. The device connects to the registry directly — see Private registry.
All platform traffic is TLS on TCP 443. Allow the whole edgelq.com domain
rather than individual hostnames: a device is directed to different service
endpoints depending on its project and region, and the set changes as the
platform grows.
At minimum, allow outbound TCP 443 to *.edgelq.com and outbound UDP 123
to your time sources. If you use a proxy, the device’s platform traffic
egresses through it.
Match subdomains at any depth
Platform hostnames carry several labels, so the rule has to match more than one
level below edgelq.com.
Many firewalls and proxies treat *.edgelq.com as matching every subdomain at
any depth, which is what you want. Some treat * as exactly one label — and
on those, *.edgelq.com matches a two-label name but not a deeper one, which
lets a device get far enough to onboard and then stops it.
If your equipment behaves that way, express the rule as a domain-suffix match
on edgelq.com instead. Squid spells this .edgelq.com; most next-generation
firewalls offer a “domain suffix” or “subdomain” match type.
DNS
The device must be able to resolve every destination above. A device on a
network with filtered or split-horizon DNS can pass a connectivity test to a
raw IP address and still fail to reach the platform. If you run internal
resolvers, confirm they resolve edgelq.com names and your registry’s name.
Inbound (on the device)
By default a device exposes only what is needed to administer it locally:
Port
Purpose
TCP 22
SSH access. Can be restricted or disabled — see SSH access.
The device also responds to local network discovery (mDNS) so it can be found by
name on the local segment; this can be turned off with the device discovery
setting.
Any ports your workloads expose are determined by the workloads you deploy,
not by the OS.
Remote access does not require inbound ports
Operator actions such as opening a remote shell, transferring files, or
streaming logs are carried over the device’s existing outbound connection to the
platform. You do not need to open inbound ports to use them. See
Remote access.
Firewall planning checklist
Allow outbound TCP 443 to *.edgelq.com (directly or via proxy),
matching subdomains at any depth.
Confirm the device can resolve those names with the resolvers it will
actually use on site.
Allow outbound TCP 443 to your container registry, if you deploy from
a private one.
Allow outbound UDP 123 to your NTP sources.
Allow outbound UDP to your chosen STUN servers (or accept that external
IP discovery is unavailable).
If traffic passes through a proxy, confirm it permits HTTP CONNECT to
port 443 and does not terminate TLS — see Proxy configuration.
Decide whether local TCP 22 (SSH) should be reachable on your LAN.
Open any ports your workloads require, per workload.
Set NTP servers and understand the default time behavior of a device.
Accurate time is important for secure connections, certificate validation, log
correlation, and device attestation. Devices keep their clocks synchronized over
the network using NTP.
Default behavior
Devices use chrony as their NTP client. Out of the box a device
ships without a custom time configuration, so it synchronizes against the
public pools that its Linux distribution configures by default — typically
ntp.ubuntu.com and the 0–2.ubuntu.pool.ntp.org pools. A device with
internet access therefore keeps accurate time without any configuration.
Treat those pool names as a default that can change with the distribution, not
as a contract. If you need to know exactly what a given device is using, read
/etc/chrony/chrony.conf on the device, and set your own sources if the answer
matters to your firewall rules.
Setting custom NTP servers
If your environment requires specific time sources — for example, internal NTP
servers on an isolated network — you can provide your own NTP configuration. You
can set it:
at image creation, so it applies from first boot, or
by placing a chrony-format configuration at
/isodevice/config/chrony.conf on the device.
When custom NTP settings are provided, they take effect early in the boot process
so the device’s clock is correct before it contacts the platform.
When a device cannot reach a time source
A device with no reachable NTP source keeps running, but its clock is left to
drift against whatever the hardware clock holds. Once the drift is large enough,
certificate validity checks start to fail, and the symptom you see is a device
that appears offline in the dashboard even though its network is otherwise
healthy — the TLS handshake to the platform cannot complete.
This failure is easy to misread, because the device can still reach the
internet. If a device will not come online, check its clock before you go
looking at firewall rules. See Troubleshooting.
Recommendations
On networks without internet access, always configure reachable internal
NTP servers; otherwise the device cannot correct its clock, which can cause
secure connections and attestation to fail.
Make sure outbound UDP 123 to your time sources is allowed — see
Connectivity & ports.
Clock errors and connectivity
A device whose clock is far off may be unable to establish TLS connections to the
platform and may fail attestation. If a device cannot come online and you suspect
time, verify it can reach an NTP source.