This section covers running devices day to day: upgrading the OS and rolling
back, rebooting and recovering, checking device health, reading status
indicators, running scripts at boot and shutdown, and deploying workloads.
In this section
OS upgrades — move devices to a new OS version, and roll back.
Logging — forward system and container logs, and pull logs on
demand. Covered under Monitoring & alerts.
1 - OS upgrades
Upgrade or roll back a device’s OS version, and what survives the change.
You upgrade a device’s operating system by setting the OS version you want; the
device downloads the new version, switches to it, and reboots. Because the
system image is separate from your configuration and data, your
setup is preserved across the change, and you can roll back to a previous version.
How upgrades work
You set the target OS version for a device (or a group of devices) from
the dashboard.
The device downloads the requested version and prepares it alongside the
current one.
The device switches to the new version and reboots.
After reboot, the device reports its new version, and your configuration and
data are intact.
A device keeps more than one OS version on disk — the one it is running and the
one it can fall back to — which is what makes switching versions and rolling back
fast and safe.
flowchart TB
    subgraph BEFORE["Before"]
        direction TB
        A1["System image slot A<br/><b>running 2.1.0</b>"]
        B1["System image slot B<br/><i>previous version</i>"]
    end

    subgraph AFTER["After upgrade and reboot"]
        direction TB
        A2["System image slot A<br/><i>kept for rollback</i>"]
        B2["System image slot B<br/><b>running 2.1.2</b>"]
    end

    KEEP["Configuration + data<br/><i>untouched throughout</i>"]

    BEFORE -->|"1. download 2.1.2 into the spare slot<br/>2. switch<br/>3. reboot"| AFTER
    KEEP -.-> BEFORE
    KEEP -.-> AFTER
Rolling back is the same operation in reverse: the previous version is still in
the other slot, so the device does not need to download anything.
Release channels and compatibility
OS versions are published per device type, so a device is only
offered versions compatible with its hardware.
Some upgrades may require a minimum current version before you can move to
the target, to ensure a supported upgrade path.
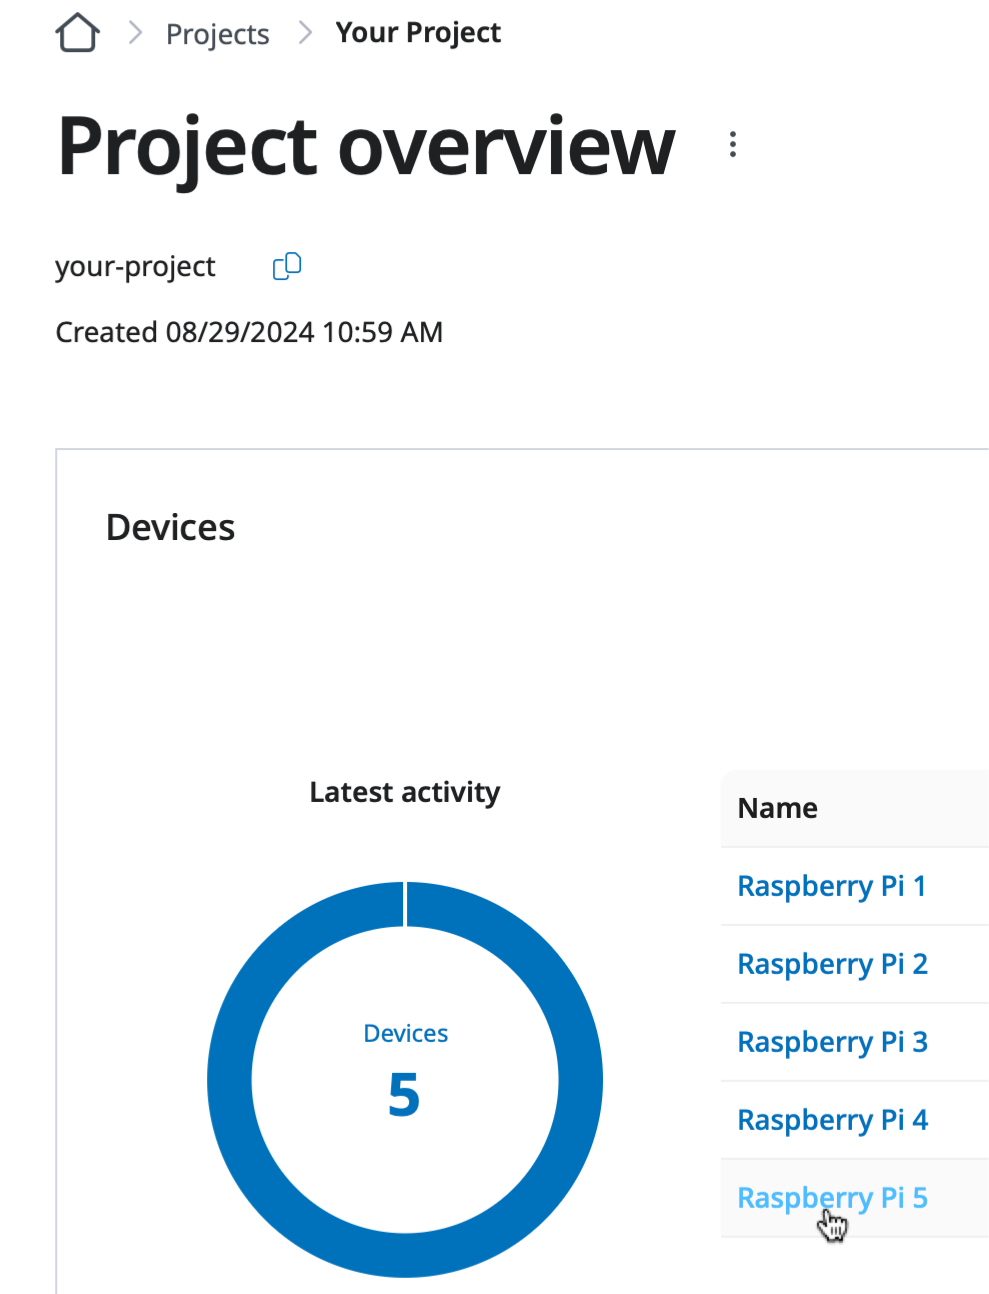
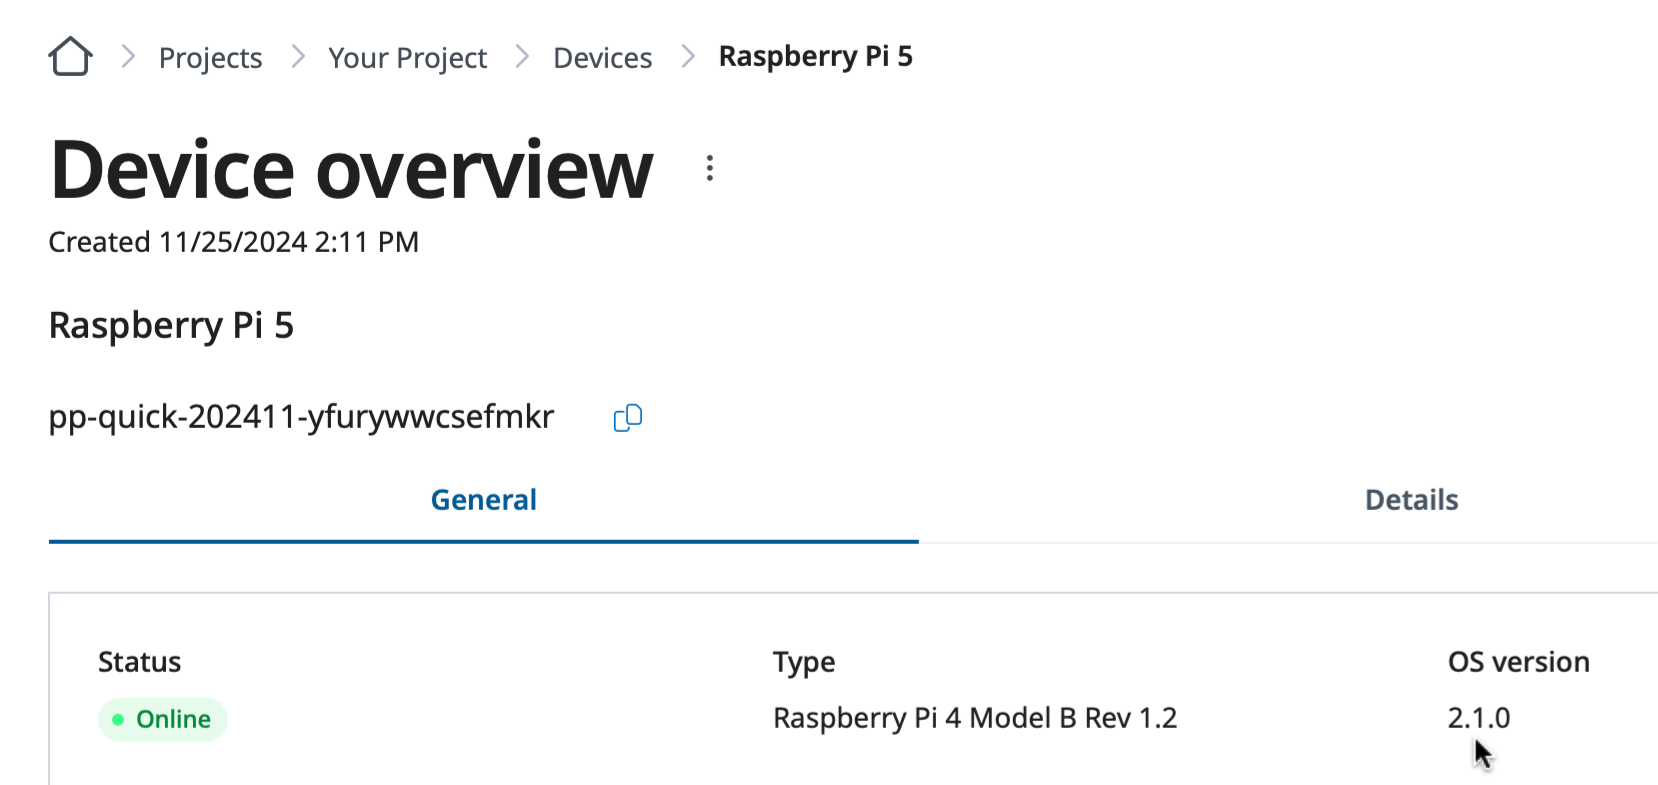
Go to the Device overview page of the target device under your project by clicking the
name of the device on the Project overview page.
Clicking the device name on the Project overview page.
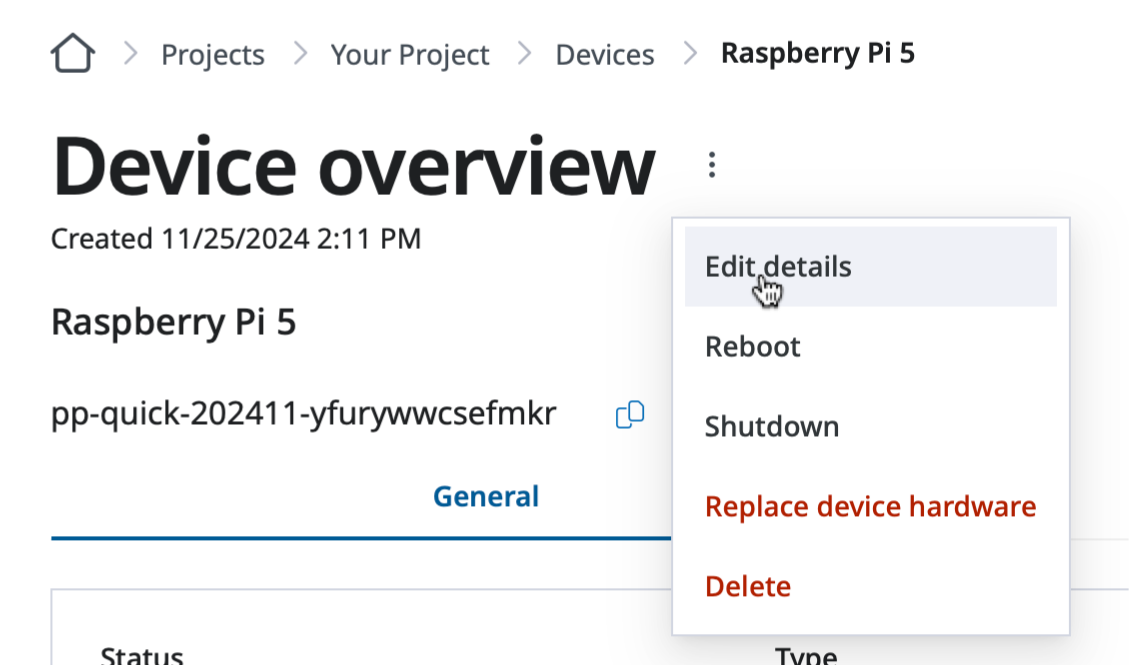
Open the Update device details page by clicking the Edit detail option of the
device menu option.
Click the Edit detail option of the device menu option.
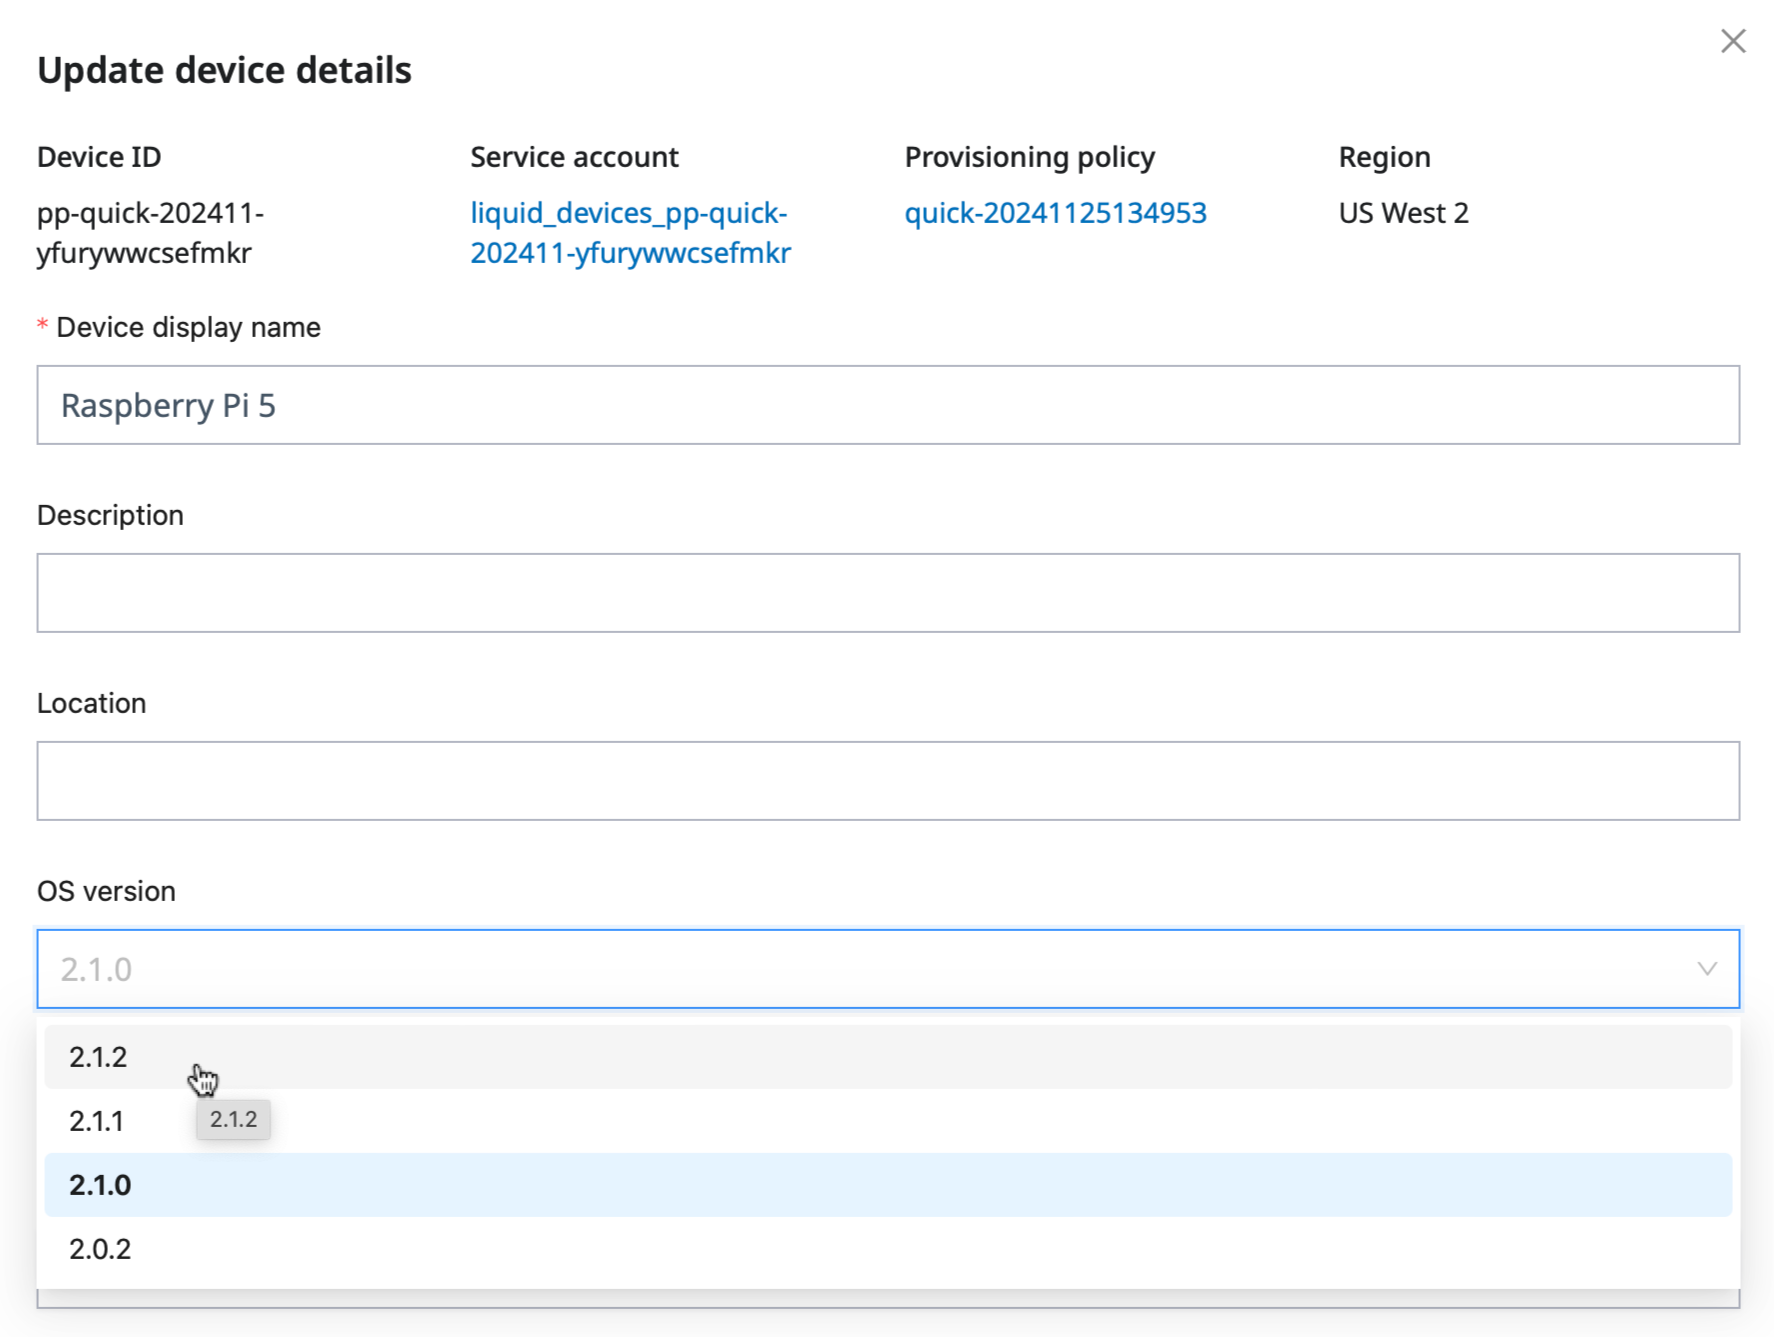
Select the OS version, 2.1.2 in this example, and click Save to trigger the OS upgrade
process.
Specify the desired OS version on the Update device detail page and click Save.
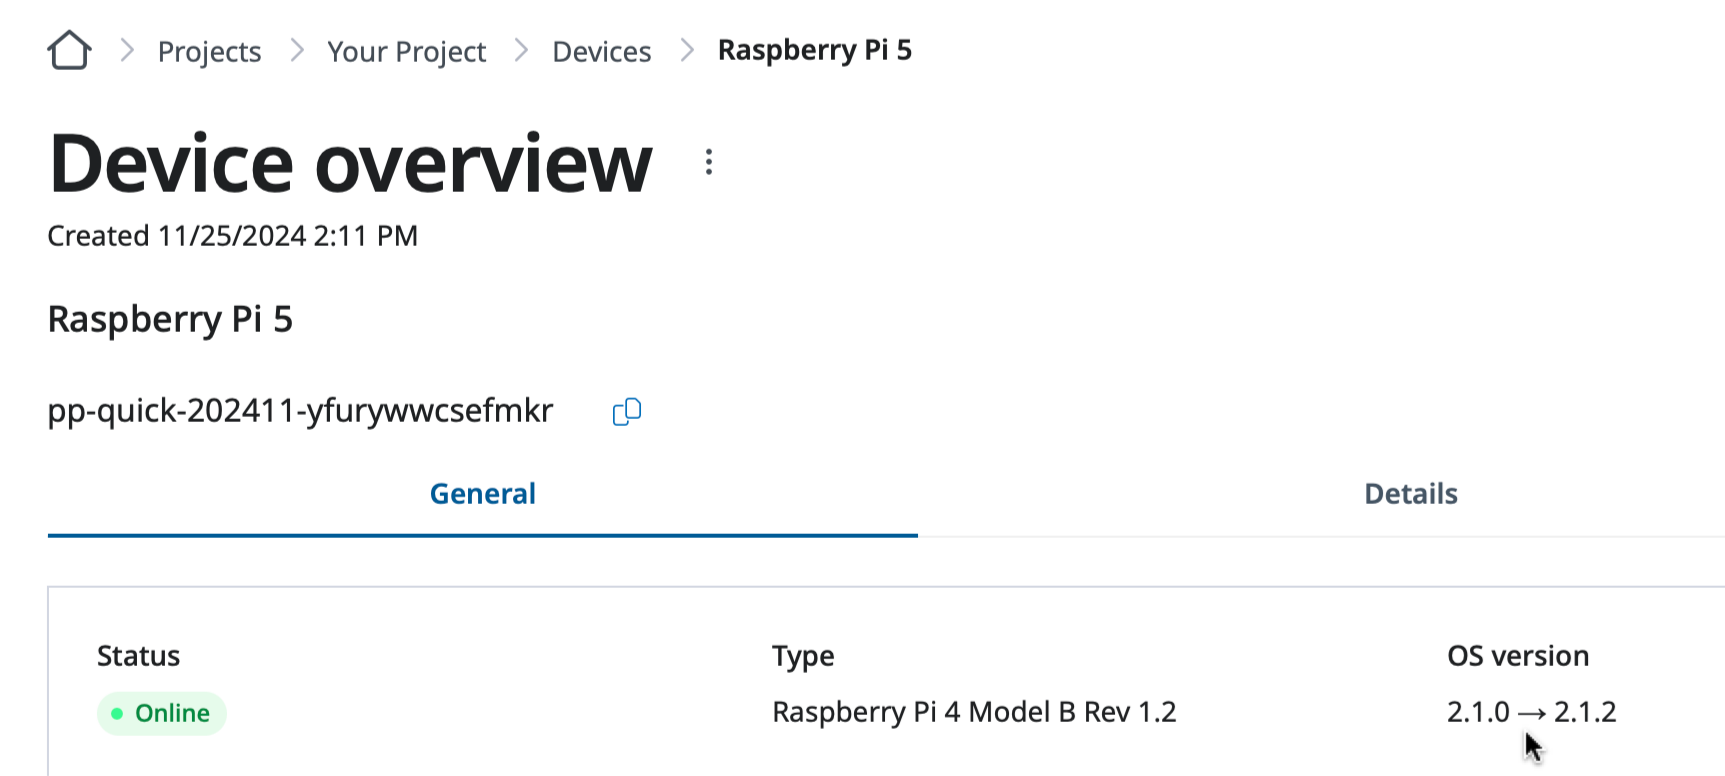
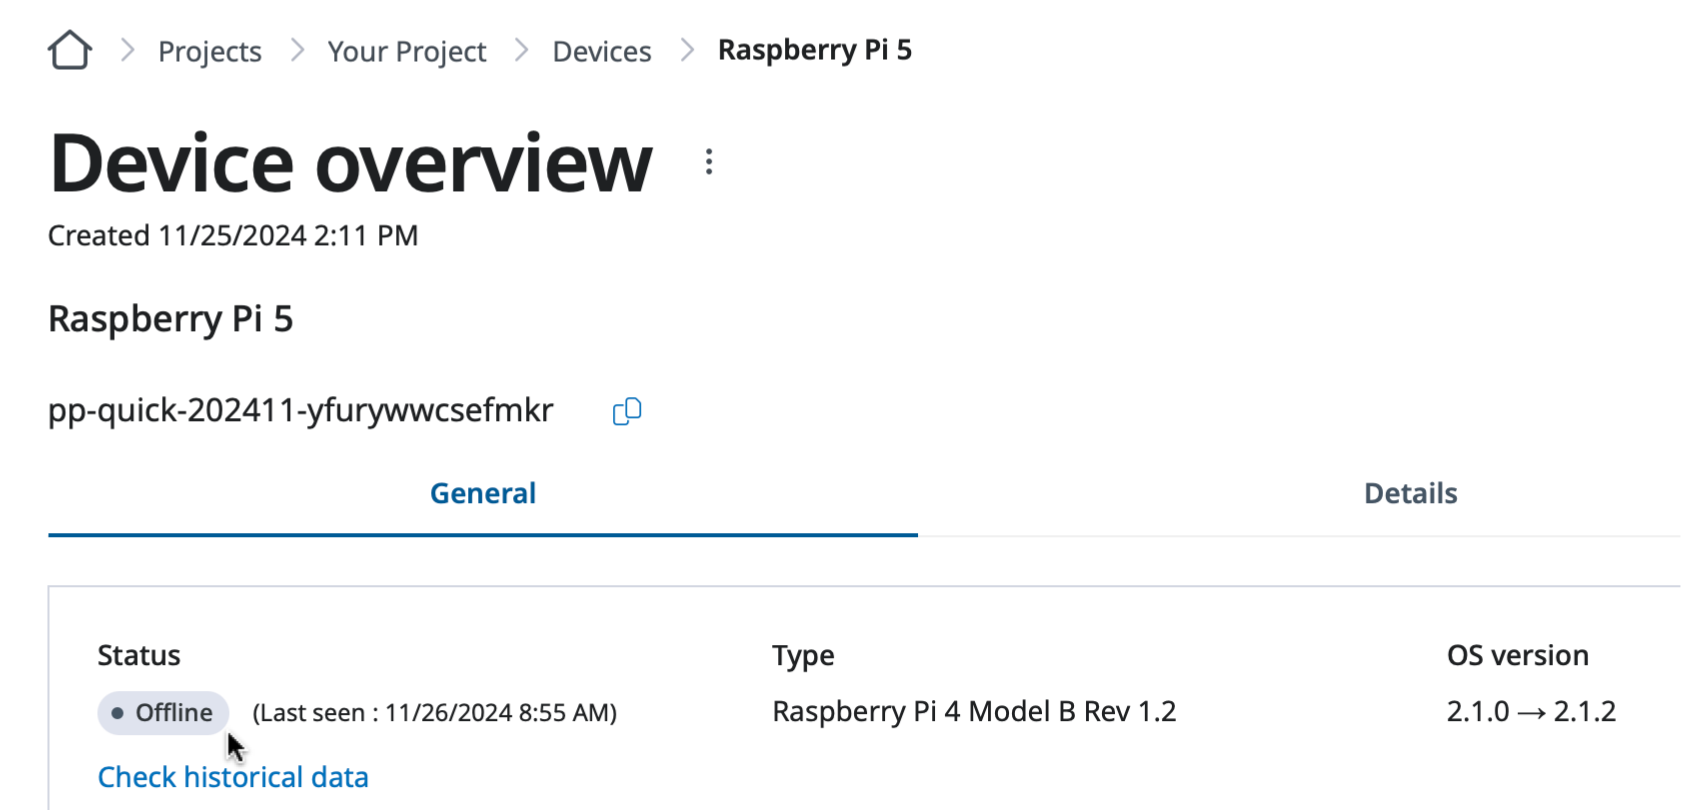
The upgrade operation will start automatically and you will see the OS version
transition information on the Device overview page.
OS version transition information on the Device overview page.
After some time, you will see the device Offline, which indicates the device is restarting
with the new OS version.
The device is shown as Offline to finalize the upgrade process by restarting the device.
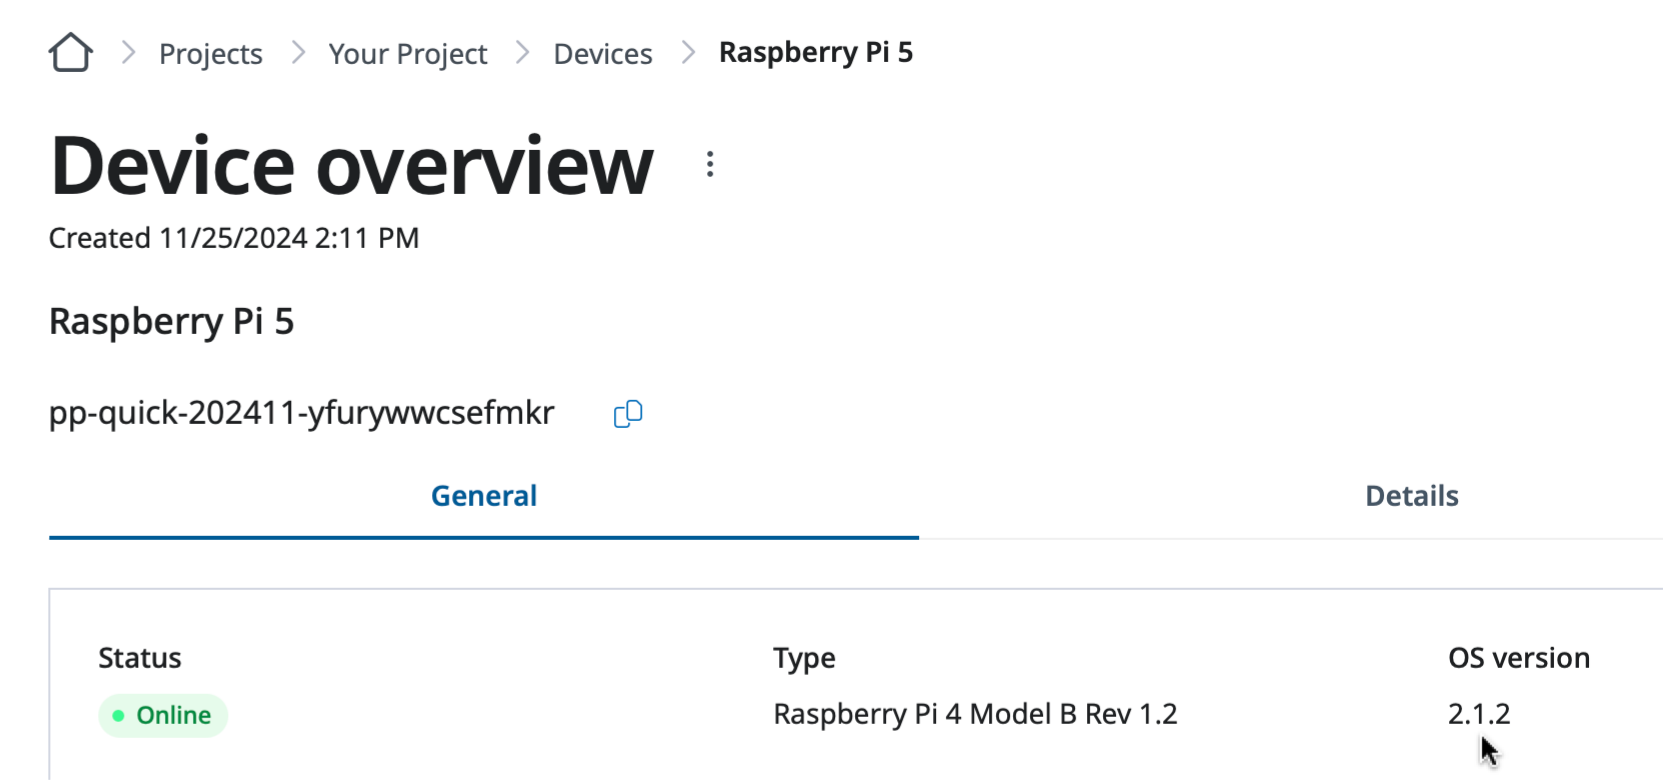
You will see the device up and running with the new OS version on the Device overview page
once it boots up.
The device is up and running with the new OS version.
Rolling back
If a new version misbehaves, you can roll a device back to the version it was
running before, or to its original factory version. Because the previous version
is retained on the device, rollback does not require re-downloading it.
Set the desired (earlier) version the same way you set an upgrade; the device
switches back and reboots.
Caution on OS downgrading
Downgrading the OS can cause problems — some features may stop working, and
devices can become unreachable. Please consult SPEKTRA Edge customer support
before starting a downgrade.
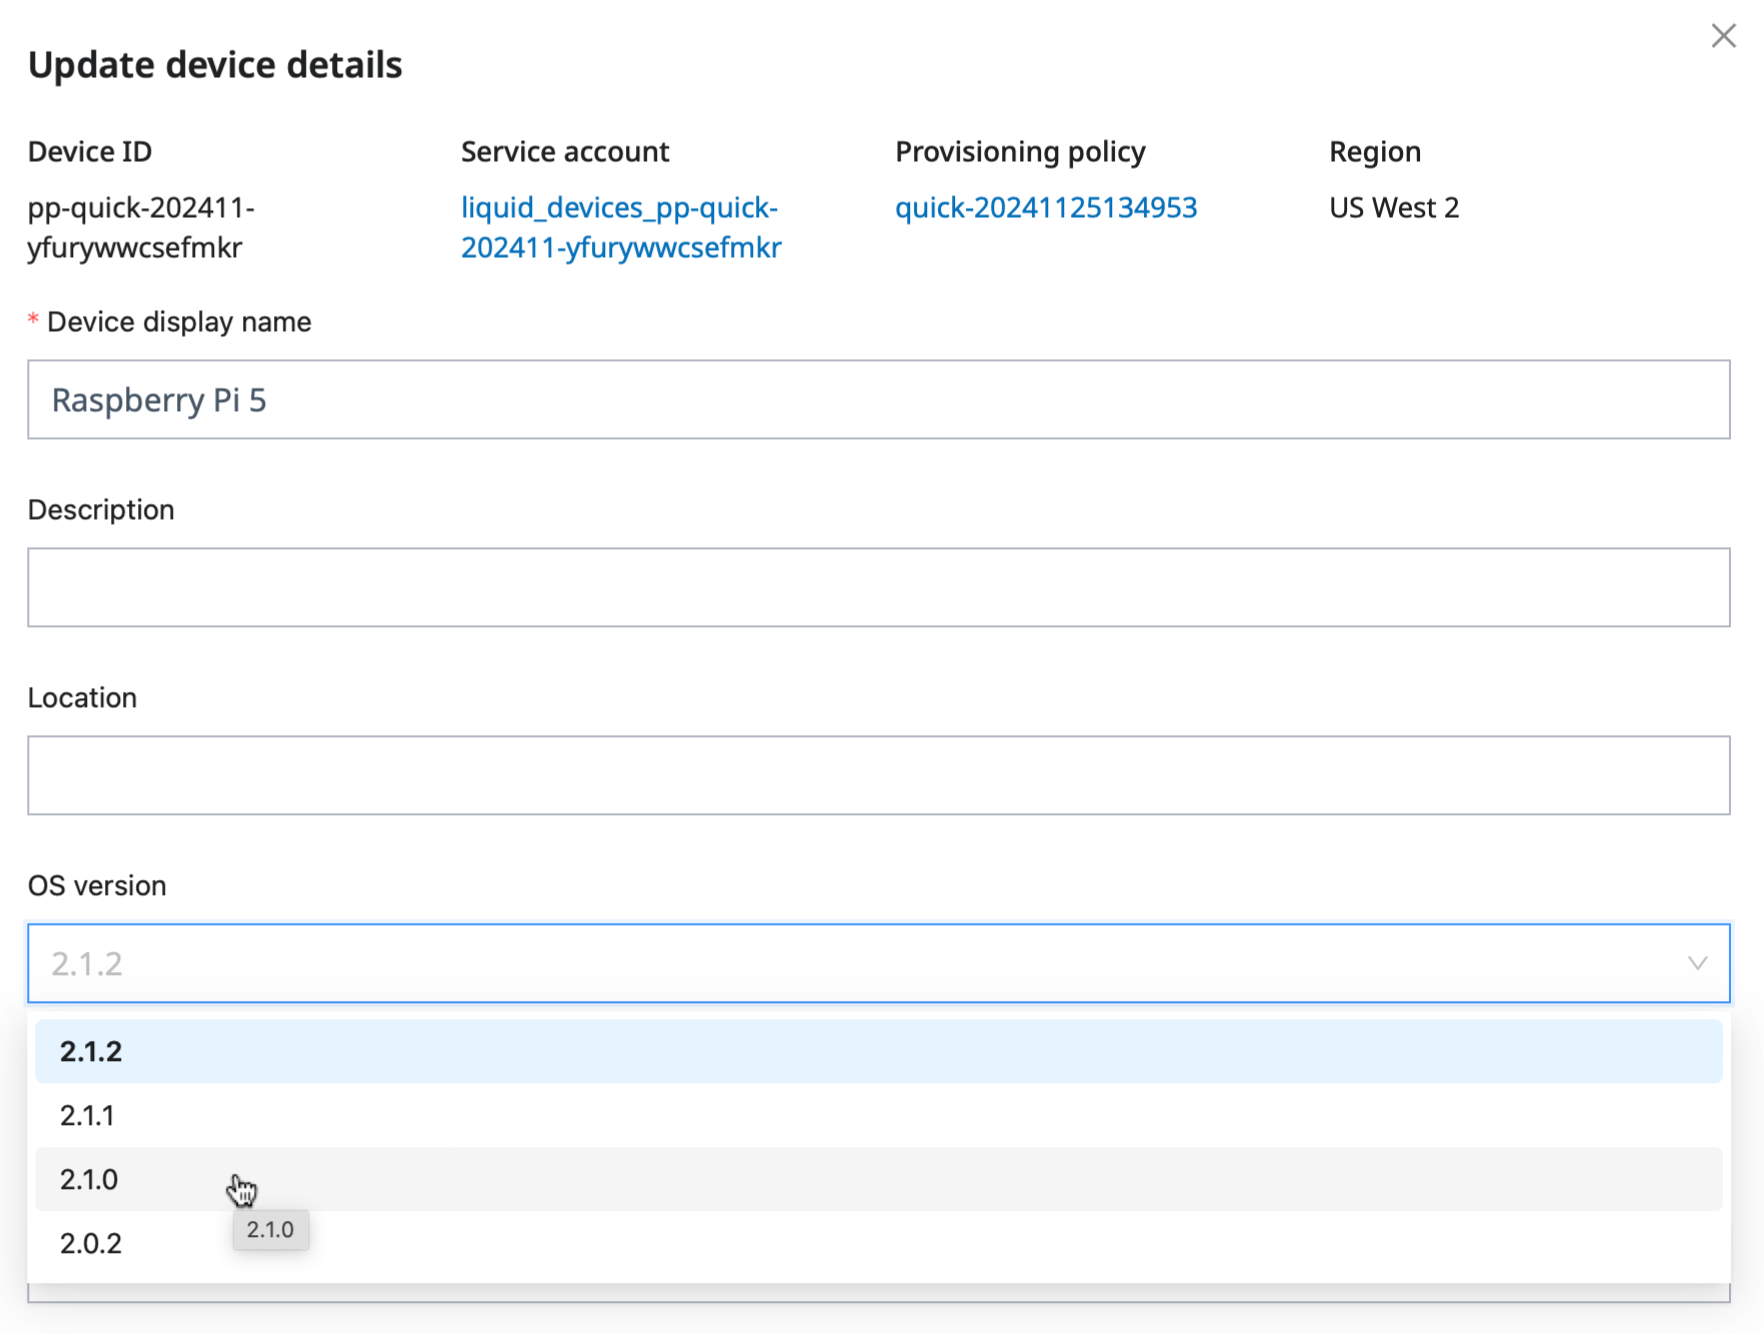
Select the downgrade OS version, 2.1.0 in this example, and click Save
to trigger the OS downgrade process.
Specify the desired OS version on the Update device detail page and click Save.
The OS downgrade process automatically starts once you click the Save button of the
Update device details page.
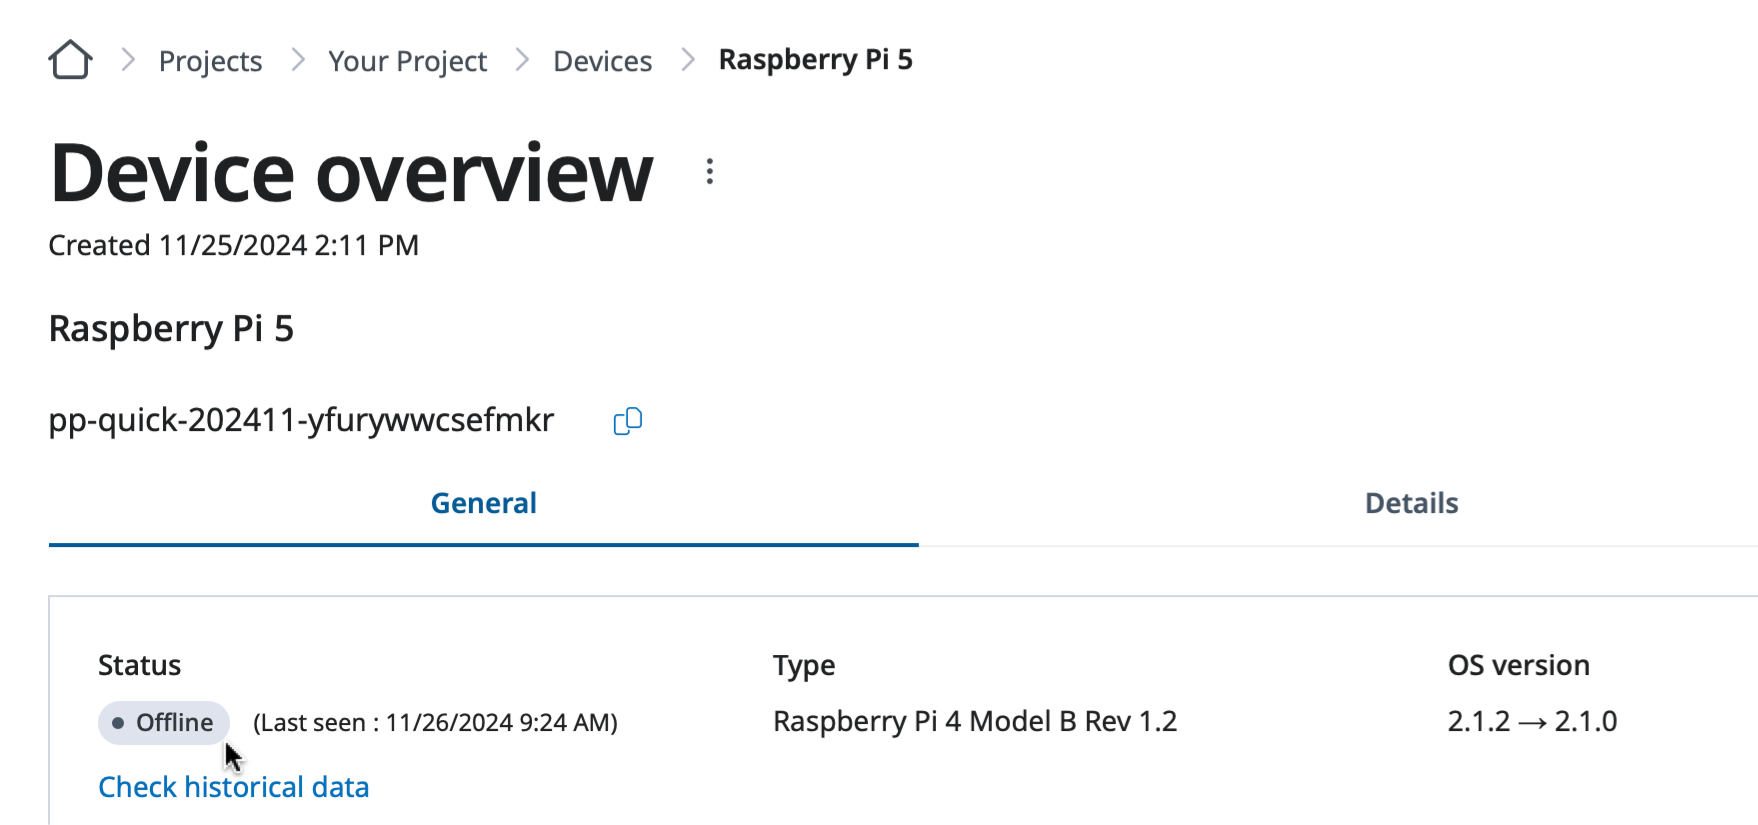
After a minute or so, you will see the device status Offline with the OS version transition
information on the Device overview page.
OS version transition information on the Device overview page.
You will see the device up and running with the new OS version once it boots up.
The device is up and running with the new OS version.
Encrypted devices
Managed upgrades preserve automatic unlock on encrypted devices —
no manual action is required to keep an encrypted device unlocking across an
upgrade.
If an upgrade does not complete
Confirm the device has connectivity to download the new version
(including through any proxy).
A device that fails to start a new version can fall back to the retained
previous version.
Remote power actions, and the options for recovering a misbehaving device.
This page covers power actions you can take remotely and the options for
recovering a device that is not behaving as expected.
Reboot and shutdown
You can reboot or shut down a device remotely from the
dashboard or with the cuttle command-line tool. These actions
are carried over the device’s connection to the platform and require no inbound
access to the device.
A device that loses power or is reset returns to its configured state on next
boot, because configuration and data are persistent and the system image is
read-only.
Automatic recovery
The OS is designed to keep itself running unattended:
It restarts automatically after an unexpected fault rather than waiting at an
error.
Workloads configured to run are brought back up after a reboot.
If a network configuration change does not produce a working connection, the
device can fall back to known-good network settings — see
connection fallback.
Recovery options
When a device needs hands-on recovery, the options in increasing order of impact:
If a device is offline and unreachable through the platform, work through the
troubleshooting playbooks — most often the cause is
connectivity, time, or a network configuration change.
Define checks that let a device report its own health to the platform.
Health checks let a device continuously verify that it — or something running on
it — is healthy, and report the result to the platform. You define health checks
from the dashboard (or the API).
Types of checks
You can define host-level checks of several types:
Type
Verifies
HTTP
An HTTP endpoint responds as expected.
TCP
A TCP port accepts a connection.
gRPC
A gRPC service reports healthy.
ICMP
A host responds to ping.
Command
A command on the device exits successfully.
Device file
An expected device file or path is present.
How results are used
Each check’s result contributes to the device’s reported conditions, which
you can see on the device overview page. Use health checks to detect problems
such as a dependent service being unreachable, a required peripheral missing, or
a local endpoint failing — and to surface them centrally instead of discovering
them per device.
Recommendations
Check the things that matter for the device’s role (for example, the local
application endpoint, or a sensor’s device file).
Keep checks lightweight and give them sensible intervals so they reflect real
health without adding load.
Read device state from the platform and from the hardware status LED.
A device reports its state both to the platform and, on supported hardware,
through a physical LED. This page explains how to read each.
Connection status
On the platform, a device is shown as:
Status
Meaning
Online
The platform detects the device as connected.
Offline
The device is not detected, or is detected as disconnected.
Device information and metrics
The device reports details and resource usage you can view on the
dashboard, including:
OS version, hardware details, disks, and network interfaces
CPU, memory, and storage usage
temperature
These help you spot devices that are low on storage, running hot, or pinned at
high resource usage.
Detailed dashboard walkthrough
For where to find status, details, and metrics on the dashboard, see
Manage devices.
LED indicator
On hardware with a status LED, the device signals its lifecycle and health
through the LED so an on-site technician can tell at a glance what state a device
is in — for example, still starting up, working normally, or needing attention.
Use the LED for quick on-site triage, and the dashboard for detail.
Conditions from health checks
Health checks you define contribute to the device’s reported
conditions, giving you application- and peripheral-level health alongside the
built-in status.
Related
Health checks — defining the checks that feed device conditions.
Run your own scripts at defined points in the device lifecycle.
Hooks let you run your own scripts at defined points in the device lifecycle —
for example to prepare hardware, mount a special device, or clean up on
shutdown. They are the supported way to extend device behavior without modifying
the read-only system image.
Available hooks
You can provide a script for each of these points:
Hook
Runs
On boot
Early in startup, before the device agent starts.
After the agent starts
Once the device agent is up.
On shutdown
When the device is shutting down or rebooting.
How to provide a hook
Place an executable script in the hooks location on the device’s
configuration storage. Because it lives on configuration storage,
the script persists across reboots and OS upgrades and is run
automatically at the corresponding point. See the
persistent paths reference for the exact location.
Guidelines
Keep hooks fast and resilient. A slow or failing boot hook delays startup;
make hooks idempotent and have them exit cleanly.
Do not rely on modifying the system image. Use hooks to act on
configuration and data, not to patch the OS — image changes do not persist.
Log from your hook so you can see what it did via logging.
Test on one device first before distributing a hook to a fleet.
Hooks run with elevated privileges
Hook scripts run with the privileges needed to administer the device. Treat them
as trusted code and control who can place them on your devices.
How containerized workloads interact with the device operating system.
Devices run your applications as containers. You deploy and manage them from the
SPEKTRA Edge platform; this page covers only how workloads interact with the OS.
For the full application deployment workflow, see the Deploy guide.
How workloads use device storage
Container images and workload data live on the device’s data area,
which uses most of the disk.
A workload can mount paths from the device into its containers when it needs
access to host data or hardware.
Credentials a workload needs (such as registry pull secrets) are delivered
through the platform rather than stored in the image.
Networking for workloads
Any network ports a workload exposes are determined by the workload itself, not
by the OS — open them in your site firewall as needed. See
Connectivity & ports.
Because container images and data share the data area, a device that fills its
data area can fail to start new workloads. Watch storage usage in
device metrics, and keep logging levels reasonable so logs
do not consume the space your workloads need.
Lifecycle across reboots and upgrades
Workloads configured to run are brought back up after a reboot, and persist
across OS upgrades because their images and data are on persistent
storage.